One Pan Garlic Parmesan Chicken & Zucchini

I'd like to preface this post by saying that Brandon asks me to make this for him all. the. time.

Even if he has a different dinner idea. If I bring up parmesan chicken, he's down.


It's a hit...and it's only caused me one minor emotional breakdown! Which is a win for me if you've ever see me try to cook dinner.

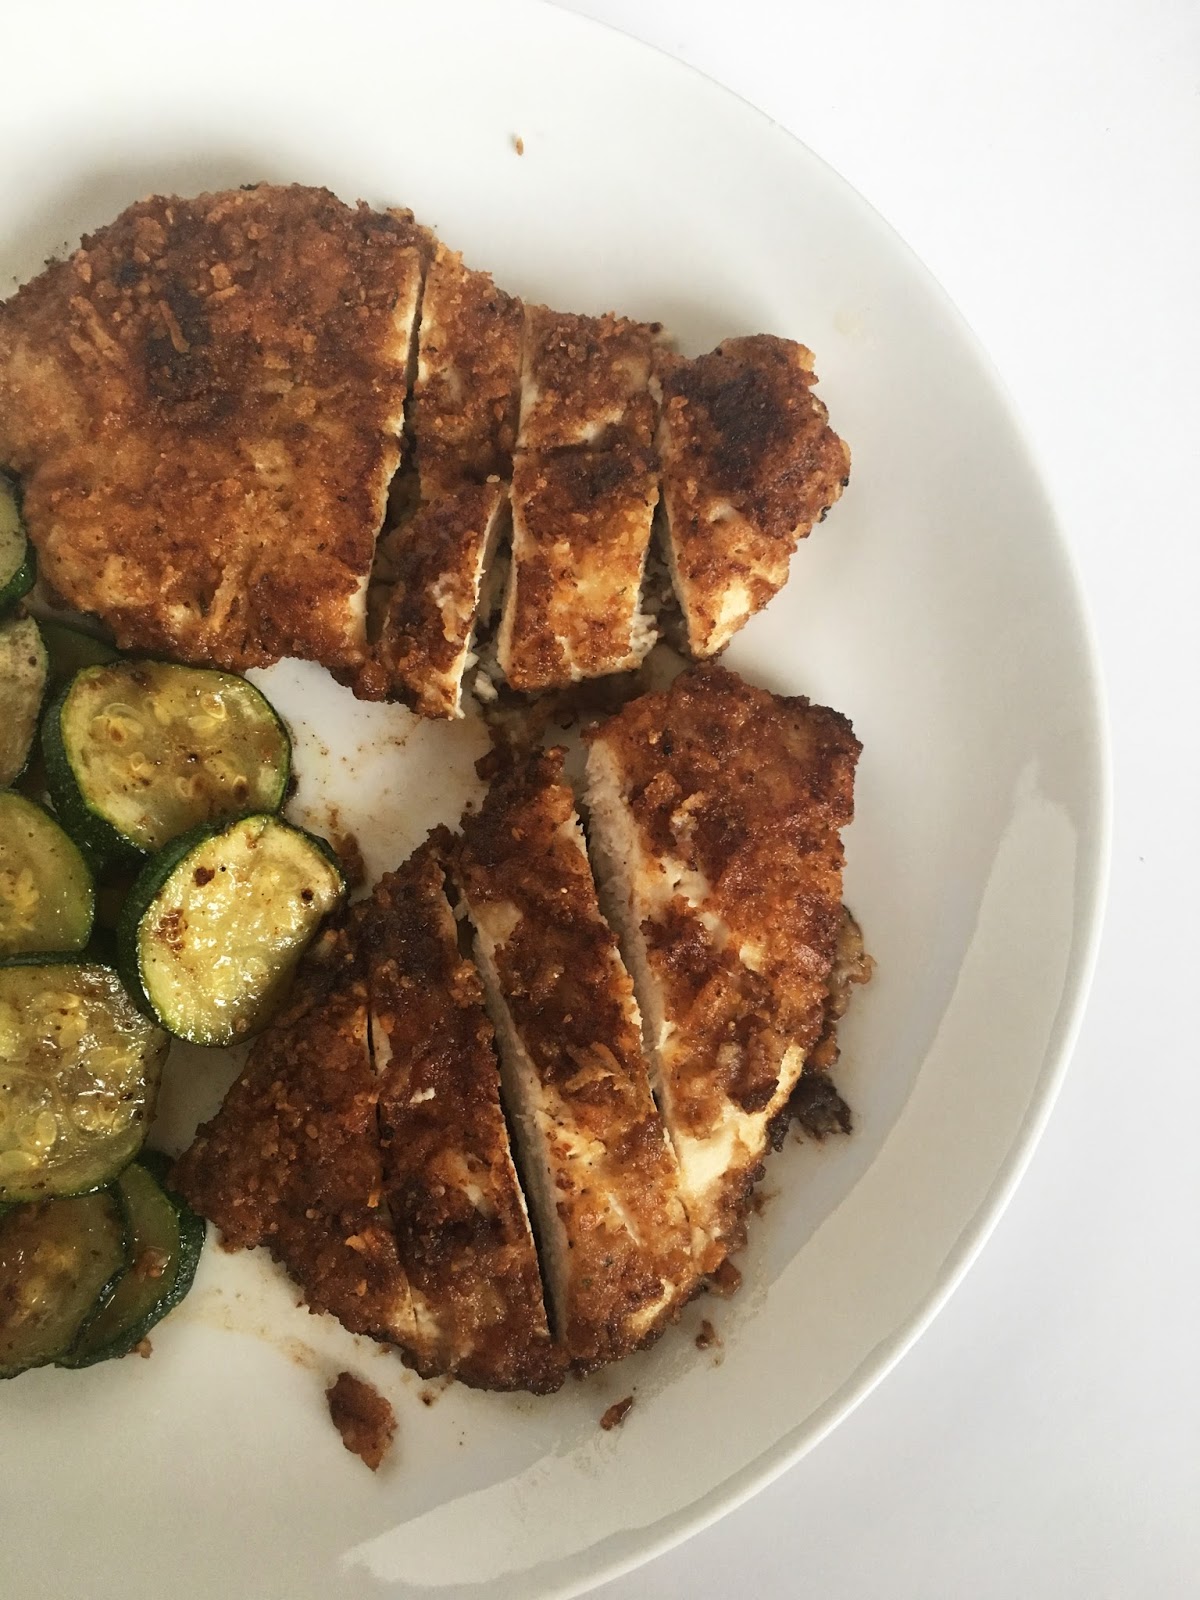
Let's just say, you can't really go wrong with the flavors here. It's cheesy, crispy, buttery, tender...all the good adjectives.

And you know what else it is? ONE PAN. One pan dishes have become my new best friend since living on my own because I despise doing the dishes. After I've slaved away in the kitchen making my dinner the last thing I want to do is dishes. The way my kitchen is laid out, my (limited number of) guests would suspect nothing if I just shoved them all to the side....

Just kidding. I (almost) always do my dishes, even though I hate it.

But this recipe makes it sooo much easier for cleanup.

It's also really easy to make this dinner for one, and that's what I've featured here. Depending on how many mouths you have to feed and how hungry they are, you can adjust accordingly.

You also get to eat some delicious zucchini. It's buttery and garlicky...have I sold you yet?

First, you'll cook up the chicken. Make sure the pan is hot enough to create a crispy crust, but not so hot that it burns. It should look like this:

Then goes the zucchini! I like to wipe out the pan a little bit to get rid of some of the burnt butter, but you don't need to wash it completely. Melt the butter, saute some garlic and add the zucchini.

You can toss the chicken back in with the zucchini to warm it up, but mine usually stays pretty warm on the plate since the zucchini doesn't take too long to cook.


And you're done! See? So simple. Yet so good.

Extra points if you can get your significant other to wash the pan for you...though I haven't succeeded there yet. 😉


print recipe

One Pan Garlic Parmesan Chicken & Zucchini
An incredible one-pot meal featuring juicy, crispy chicken and buttery zucchini!
Ingredients
  • 1 chicken breast, sliced in half
  • 4 tablespoons butter, divided
  • 1/4 cup Italian bread crumbs
  • 1/4 cup plus 1 tablespoon grated parmesan, divided
  • 1/8 cup flour
  • 1 zucchini, sliced
  • 1 garlic clove, minced
Instructions
1. Make breading mixture by combining bread crumbs, grated parmesan and flour into a shallow dish. Melt 2 tablespoons of butter in another shallow dish.2. In a large skillet over medium heat, melt 1 tablespoon of butter.3. Dip the chicken in the melted butter, and then into the breading mixture making sure all sides are coated. Place in heated skillet.4. Cook on each side for about 3-4 minutes, making sure the breading doesn't burn. Cook until the outside is crispy and the chicken is fully cooked. Set aside.5. Slightly wipe out pan, and then melt 1 tablespoon of butter. Add garlic and saute for about a minute. Add the zucchini to the pan, sprinkle with salt and pepper, and saute until tender. Add 1 tablespoon of parmesan if you wish, then add the chicken back in the pan until warm. Serve immediately.
Details
Prep time: Cook time: Total time: Yield: 1-2

Recipe adapted from The Recipe Critic.


What's your favorite quick and easy meal to make?

No Bake Energy Bites

Despite the sugary treats primarily featured here, I've recently been cleaning up my diet. For me that means eating more whole foods and making my meals from scratch when possible. When making a meal from scratch, I'm able to know exactly what I'm putting in my body. Knowing what's going in my body means I can figure out what does and doesn't work for me.

That's why these no-bake energy balls are a major win!


I came across this recipe when I was hunting for a good pre-workout snack. I hate waking up early, so I had been skipping a snack before the gym. Since the walk to my apartment complex gym is literally 0.4 seconds, I don't have a lot of time to eat and digest. After noticing my energy levels were extremely low post-workout, but knowing I wouldn't get up any earlier in the morning (stubborn, party of one) I knew I needed a quick and filling snack.

These are PERFECT.


And they taste....a little too good. I started eating them way too often. For breakfast...for a snack...for dessert. I started to wonder if they were as good as I thought.

I did a little research (on MyFitnessPal) and found there are about 116 calories per energy bite. Not too bad, but I wouldn't recommend eating them like they're vegetables like I had been. ;)

They're super easy to make too. Just mix everything together in a medium-sized mixing bowl, chill, and roll into balls.


In the past, measuring peanut butter was always a hassle. It feels like you can never scrape it all out of the measuring cup! Well, if you haven't heard of these Measure-All Cups from Pampered Chef, you HAVE to get one. Measuring peanut butter (and literally everything else) just became so easy.


Once you've measured the oats, coconut, peanut butter, dark chocolate chips, honey and vanilla, it's time to move on to a few of my favorite things: flaxseed and chia seeds.


Flaxseeds are a great source of healthy fats and you will gain the most benefit from them when eaten ground. Modern research suggests flaxseed can help lower the risk of diabetes, heart disease and even cancer!

Unlike flaxseeds, chia seeds do not need to be ground for absorption! They are one of the most nutritious foods on the planet and are loaded with Omega-3 fatty acids, fiber and protein.


When everything is incorporated, chill for 30 minutes so it's easier to roll the dough into balls. Roll batter into balls and store for about a week in the fridge.


print recipe

No Bake Energy Bites
Healthy and filling energy bites that are perfect for a pre-workout snack, a quick breakfast or even dessert!
Ingredients
  • 1 cup dry old-fashioned oats
  • 2/3 cup coconut flakes
  • 1/2 cup peanut butter
  • 1/2 cup dark chocolate chips
  • 1/3 cup honey or agave
  • 1/2 cup ground flaxseed
  • 1 tablespoon chia seeds
  • 1 teaspoon vanilla extract
Instructions
1. Combine all ingredients in a medium sized bowl until thoroughly incorporated.2. Cover and let chill in the refrigerator for about 30 minutes.3. Once chilled, roll into balls (Mine usually are 1 in. in diameter). Chill and store in airtight container for about 1 week.
Details
Prep time: Cook time: Total time: Yield: 24 balls

Recipe adapted from Gimme Some Oven.


Do you have a favorite pre-workout snack?

Sea Salt Caramel Brownies

We have this brownie tradition in my family and let me tell you, I'm not mad about it. Every year for her birthday my Mom has one request: brownies. I ask her what kind and she says it doesn't matter. Peanut butter, caramel, nuts, double chocolate...they are all welcome.

And if you didn't already know, I happen to have this thing for salted caramel. Two years ago I tried to incorporate salted caramel into basically every single dessert I made. It got a little out of hand. I made these salted caramel butter cookies that were incredible at first...and then the salt melted into the caramel. They were SO salty. You think that would have caused me to lay low with the salted caramel.

But I couldn't just give up like that. And thank GOODNESS I didn't.


Helloooooo gorgeous.

This is probably a great time to let you know that brownies are my kryptonite. Every time I make brownies I flash back to the time when I made a pan that ended up being way too thick (literally 4-5 inches thick). It was a molten mess in the middle and hard as a rock on the outside. I don't even remember what I was trying to make or why...I've since blocked that part from my memory.

Since then I will not allow myself to make brownies un-supervised. Since my sister and nephew were in town for my mom's birthday, I ended up staying at my parent's house for the week. My grandma was also in town, so I had all hands on deck for these babies.

But let me tell you. They turned out SO GOOD.


Look at those layers, my friends. Two-thirds of the brownie batter is baked for 12 minutes before adding the caramel and the rest of the batter, and you'll need to make sure you get that full two-thirds. I did a little less and didn't end up with the pretty chocolate/caramel swirl on top.

I highly recommend garnishing the tops with sea salt. Given my last salted caramel fiasco, I was nervous about adding the salt directly to the caramel so I think I under-salted it. Sprinkling a little sea salt on the top gave me that perfect sweet and salty combo I was craving.


print recipe

Sea Salt Caramel Brownies
An incredible combination of salty, sweet, chocolate and caramel. Perfectly fudgy and decadent!
Ingredients
  • 2 cups sugar
  • 3/4 cup baking cocoa
  • 1 cup vegetable oil
  • 4 eggs
  • 1/4 cup 2% milk
  • 1 1/2 cups all-purpose flour
  • 1 teaspoon salt
  • 1 teaspoon baking powder
  • 1 cup (6 ounces) semisweet chocolate chips
  • 14 ounces wrapped caramels
  • 1 can (14 ounces) sweetened condensed milk
  • 1 teaspoon coarse sea salt
Instructions
1. Preheat oven to 350 degrees. Spray your pan with cooking spray. You can also line the pan with parchment paper or aluminum foil if you're worried it will stick. I only used cooking spray and it worked just fine for me.2. In a large bowl combine the flour, salt, and baking powder. In another large bowl, beat together the sugar, cocoa, oil, eggs and milk. Add the dry ingredients until blended. Fold in chocolate chips.3. Spoon a full two thirds of the batter into the greased 9x13 inch pan. Bake for 12 minutes.4. While the batter is baking, prepare the caramel. In a microwave safe bowl, heat the caramels and sweetened condensed milk stirring 30 seconds at a time until melted and smooth. You can also melt over medium low heat in a saucepan.5. Pour the melted caramel over the warm brownie layer. Sprinkle coarse sea salt on top. Drop remaining brownie batter over the top of the caramel and carefully swirl the top with a knife. Bake for an additional 35-40 minutes or until the edges start to pull away from the pan and the top begins to crack. Do not overbake. Allow the brownies to completely cool before serving (or as long as you can wait!). Can also garnish the brownies lightly with additional sea salt.
Details
Prep time: Cook time: Total time: Yield: Serves: 12

Recipe from The Recipe Critic


What's your go-to baking combo?

Allergen Free Chocolate Nut Butter Cookies

Let's face it, allergies suck.

Lucky for me, I'm only allergic to cashews (which is also kind of unfortunate since cashews are my family's favorite nut). There's only been a few cashew run-ins for me, and they typically happen around the holidays (since my family adds cashews to EVERYTHING). I consider that pretty lucky.

My sister didn't get so lucky. Unfortunately for her, the allergies she does not have....my nephew has. Among other things, their food must be free of the top eight food allergens:
  • Milk
  • Eggs
  • Peanuts
  • Tree nuts
  • Fish
  • Shellfish
  • Soy
  • Wheat
Did you know that if a food is processed in a factory that contains any of these allergens, it can be contaminated? If you have a severe allergy, it's likely that you have to avoid food processed in these factories as well. Only a few special companies have certified that their factories are allergen free, and my family is very thankful for them.

Since my sister can't have a lot of treats that the rest of us can, it makes me so so happy when I find a recipe that meets all of her requirements!

Enter these cookies.


They're chewy, crunchy and oh so sweet.

The original recipe isn't fully allergen free, but only a few tweaks were necessary. Using an egg replacement, dairy free chocolate chips, and Sunbutter made this recipe gluten, dairy, nut, and soy free. Hooray!


These cookies tend to be a huge hit with everyone, not just those with allergies. I've had friends and family look at me in disbelief when I tell them what all is left out of them.

Make sure the dough balls are slightly smaller than you think they should be. This batch flattened pretty quickly in the oven and almost all of them ran together. But honestly? It didn't even matter. They were still a hit!


print recipe

Allergen Free Chocolate Nut Butter Cookies
A delicious allergen free cookie that is sure to get everyone excited!
Ingredients
  • 2 cups sunbutter
  • 2 cups sugar
  • 2 eggs*
  • 1 teaspoon baking powder
  • 1 teaspoon baking soda
  • 1 teaspoon pure vanilla extract
  • 1 cup dairy free chocolate chips (I use the Enjoy Life brand)
Instructions
1. Preheat oven to 350 degrees F.2. Mix together sugar, baking powder, and baking soda.3. Cream together sugar mixture and sunbutter until sugar is thoroughly incorporated into sunbutter.4. If you're using an egg substitute, prepare it now according to the instructions on the package.5. Add vanilla extract to eggs and beat.6. Incorporate eggs into the nutbutter/sugar mixture.7. Fold in chocolate chips.8. Line baking sheet with parchment paper (if desired) and spoon heaping tablespoons of dough approximately 2 inches apart onto cookie sheets. Make sure your tablespoons are not too heaping because your cookies will run together. Flatten slightly for better cooking.9. Bake for 10 minutes. Cookies will look slightly moist. Allow to sit for 5 minutes on baking sheet before removing to cool completely on cooling rack.*I use Neat Egg or Vegan Egg for this. If you don't have soy or tree nut allergies, you can also use Bob Mills Egg Replacer.
Details
Prep time: Cook time: Total time: Yield: 24-30 cookies

Recipe adapted from Marine Corps Nomads


Do you have a favorite allergen free recipe?